Netflix is great, but want something even better? How about creating your very own Automated Media Server with Plex? With rTorrent, Sonarr, Jackett, and Plex, you can build your own personal library of movies and TV shows, all hosted on your private seedbox server.
I’ve got a Seedbox from UltraBoxHosting ready to go, and I’ll be using the amazing open-source tool Swizzin to make the setup the box. We have been using Swizzin extensively here at UltraBoxHosting seedboxes with few in-house modifications, making life easier for us and the users. Kudos to the contributors!
Once your software is ready, we’ll use the “box” command-line tool for fast and easy service installation.
Table of Contents
Step 1: Installing the Essentials

Use the command “box” and let’s get these services loaded:
- Panel: Our mission control center for managing the seedbox.
- ruTorrent: The web-based heart of our torrent downloading.
- rTorrent: The powerful torrent client that does the heavy lifting.
- Sonarr: Movie magic! Fetches movies and feeds them to rTorrent.
- Jackett: Connects us to our favorite torrent trackers.
- Nginx: The web server that makes everything accessible from the outside world.

Once the services are installed, proceed to open your browser and visit http[s]://<ip/hostname>/ to view dashboard.
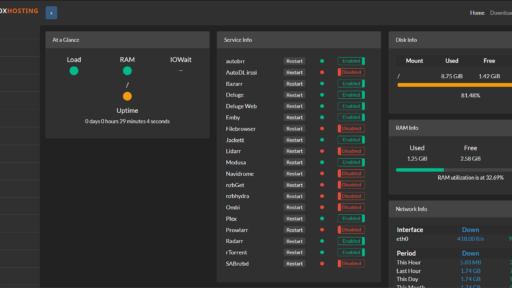
Step 2: Getting to Know Your Dashboard
This is the login page which will be available on the IP or root hostname you have set. Enter the credentials received from UltraBoxHosting mail.

Your seedbox dashboard is your control center. It shows you important stats like how much processing power (CPU) and memory (RAM) you’re using, data traffic, and more.
On the left, there’s a navigation bar with links to all your installed apps, like Jackett, Plex, Radarr, and ruTorrent. Take some time to explore their interfaces and get a feel for how they work.

Step 3: Configuring Jackett

Think of Jackett as your torrent search engine. It lets Radarr and your other apps find the movies and shows you want on your favorite torrent trackers. Here’s how to set it up:
- Add Trackers: Inside Jackett, you’ll see loads of public and private trackers. Start by choosing a public tracker and click the plus symbol to add it.

That’s the basics of Jackett – now it’s ready to help you find torrents!
Step 4: Setting Up Radarr
Radarr is the heart of your media server – it’s the magic that finds and downloads the movies you want to watch. Here’s how to get it going:
- Create a Login: The first time you open Radarr, it’ll ask you to set up a username and password.

- Check the Settings: Go to “Settings” and then “General”. If you don’t have an SSL certificate (that little lock symbol by your website address), you’ll need to turn off “certificate validation” for now.
- Connect to Jackett:
- In Radarr’s “Indexers” section, add a new “Torznab” indexer.
- Grab the Torznab link from Jackett and paste it into Radarr. Make sure the address and port are correct.
- Choose the movie and show categories you want.
- Give it a test, and save if it works!

- Connect to a Torrent Client:
- In Radarr, add rtorrent as your torrent client to help with auto-downloading.
- Give it a name, put in your server address and port (usually 443), and check the SSL box.
- Add the special URL path (something like /rutorrent/plugins/httprpc/action.php) along with your username and password for rtorrent.
- Hit save!

- Find your favourite movies: You have now successfully completed the configuration for your automated media server. Next, go to the movies page and find your favourite movie and click add.

Note: Do make sure the folder where you add the movie has “master” user as the owner. To keep things simple, I will setting the path which is already default for rtorrent downloads folder. - rtorrent – Visit ruTorrent Panel, you can see the movie successfully added for downloading.

You should now be good to setup auto-downloading movies, but we are just not done yet.
Step 5: Welcome to Plex, Your Media Powerhouse
We’ve got movies downloading automatically, and now it’s time for the magic of Plex. Think of Plex as your super-smart media organizer. Here’s what to do:
- Find Your Plex Dashboard: Click the Plex icon in your main seedbox Panel (if port 32600 does not work, try 32400)
- Get Connected: If this is your first time with Plex, it’ll ask you to set up an account and get a code. Hit this link to grab yours: https://plex.tv/link
- Build Your Library: Once logged in, find the “Library” section and click “Add New Library”. Tell Plex in which folder you downloaded movies live, then hit save.
That’s it! Plex will spring into action, scanning your movies, finding posters, and making everything look gorgeous.
Congratulations! You’ve built your very own streaming paradise. Time to grab the popcorn and enjoy!